2022/1/28 更新
再度試したところ、このままではうまくいかなかったので、追記しました。
- Route 53のプライベートホストゾーンの設定を追加
update-resolv-confをupdate-systemd-resolvedの変更
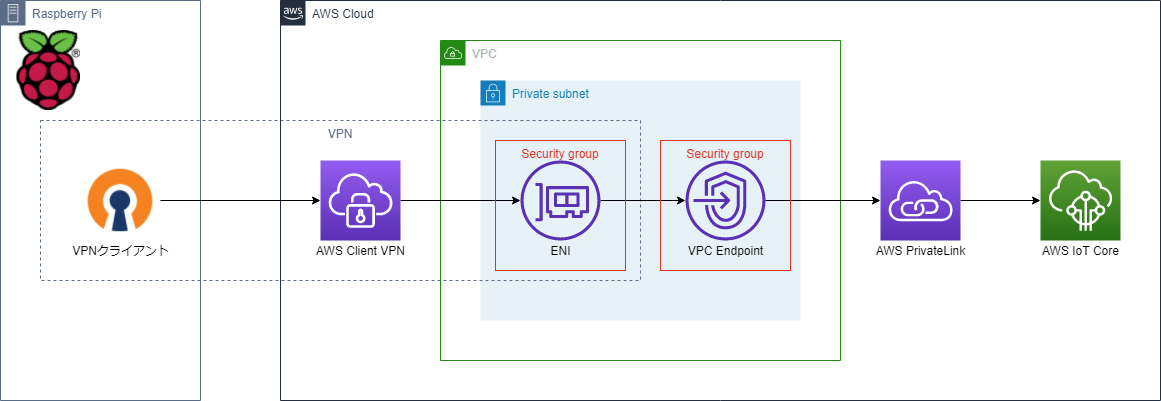
IoT CoreがPrivateLinkをサポートしたとのことで、早速試しました。 https://aws.amazon.com/jp/about-aws/whats-new/2021/07/aws-iot-core-supports-vpc-endpoints/
このような形で構成することでインターネット上にデータが出ない構成となります。
公式ドキュメントからの引用ですが、以下のような制約があります。 https://docs.aws.amazon.com/iot/latest/developerguide/IoTCore-VPC.html
- VPCエンドポイントは、現在IoTデータエンドポイントのみサポートされています。
- MQTTのキープアライブ期間は230秒に制限されています。この期間を超えるキープアライブは自動的に230秒に短縮されます
- 各VPCエンドポイントは、合計100,000台の同時接続デバイスをサポートします。それ以上の接続数が必要な場合は、「IoT CoreでVPCエンドポイントを拡張する」を参照してください。
- VPCエンドポイントは、IPv4トラフィックのみをサポートします。
- VPCエンドポイントは、カスタムドメインを除き、ATS証明書のみを提供します。
- VPCエンドポイントのポリシーは、現時点ではサポートされていません。
実際に試してみましたが、設定がまあまあな量となりました。 VPCの勉強になりました。
VPC
VPCの作成
| 項目 | 値 |
|---|---|
| 名前 | private-iot-vpc |
| IPv4 CIDR ブロック | 10.0.0.0/16 |
| IPv6 CIDR ブロック | IPv6 CIDR ブロックなし |
| テナンシー | デフォルト |
作成後、DNSの設定を変更します。
- アクション→DNS ホスト名を編集
| 項目 | 値 |
|---|---|
| DNS ホスト名 | 有効化 |
サブネットの作成
| 項目 | 値 |
|---|---|
| VPC ID | private-iot-vpc |
- サブネットの設定
| 項目 | 値 |
|---|---|
| サブネット名 | private-iot-vpc-subnet-1 |
| アベイラビリティーゾーン | ap-northeast-1a |
| IPv4 CIDR ブロック | 10.0.1.0/24 |
(* IoT向けのエンドポイントがap-northeast-1dは未対応のようなので避けましょう)
セキュリティグループの作成
Client VPN用
| 項目 | 値 |
|---|---|
| セキュリティグループ名 | private-iot-sg-clientvpn |
| 説明 | private-iot-sg-clientvpn |
| VPC | private-iot-vpc |
- インバウンドルール
| 項目 | 値 |
|---|---|
| タイプ | カスタム TCP |
| プロトコル | TCP |
| ポート範囲 | 8883 |
| ソース | Anywhere-IPv4 |
- アウトバウンドルール
| 項目 | 値 |
|---|---|
| タイプ | すべてのTCP |
| プロトコル | TCP |
| ポート範囲 | 0 - 65535 |
| ソース | Anywhere-IPv4 |
PrivateLink用
| 項目 | 値 |
|---|---|
| セキュリティグループ名 | private-iot-sg-privatelink |
| 説明 | private-iot-sg-privatelink |
| VPC | private-iot-vpc |
- インバウンドルール
| 項目 | 値 |
|---|---|
| タイプ | すべてのTCP |
| プロトコル | TCP |
| ポート範囲 | 0 - 65535 |
| ソース | Anywhere-IPv4 |
- アウトバウンドルール
| 項目 | 値 |
|---|---|
| タイプ | カスタム TCP |
| プロトコル | TCP |
| ポート範囲 | 8883 |
| ソース | Anywhere-IPv4 |
PrivateLink
PrivateLinkの作成
左メニューのエンドポイントから作成
| 項目 | 値 |
|---|---|
| サービスカテゴリ | AWS サービス |
| サービス名 | com.amazonaws.ap-northeast-1.iot.data |
| VPC | private-iot-vpc |
| サブネット | private-iot-vpc-subnet-1 |
| セキュリティグループ | private-iot-sg-privatelink |
Route 53
IoT Coreのエンドポイントの確認
Route 53の設定の前に、IoT Coreのエンドポイントを確認します。 IoT CoreのエンドポイントはAWSアカウントごとに固有となります。 自分のアカウントのエンドポイントはCLIで取得可能です。
aws iot describe-endpoint --endpoint-type iot:Data-ATSプライベートホストゾーンの作成
Route 53の画面でホストゾーンを作成します。
| 項目 | 値 |
|---|---|
| ドメイン名 | iot.ap-northeast-1.amazonaws.com |
| タイプ | プライベートホストゾーン |
| ホストゾーンに関連付けるVPC | private-iot-vpc |
レコードの作成
IoT Coreのエンドポイントのレコードを作成します。
| 項目 | 値 |
|---|---|
| レコード名 | 取得したIoT Coreエンドポイントの先頭(xxxxxxxxxxxxxx-ats)の部分 |
| レコードタイプ | A |
| 値 | エイリアスを有効にし、VPCエンドポイントへのエイリアスから作成したIoT Core用のVPCエンドポイントを選択。2つリストアップされますが、vpce-xxxx.data.iot.ap-northeast-1.vpce.amazonaws.comという方でうまくいきました |
ClientVPN用証明書をACMに登録
証明書の作成
Client VPNの認証方法のうち、相互認証 (証明書ベース)を行うための証明書を作成します。 https://docs.aws.amazon.com/ja_jp/vpn/latest/clientvpn-admin/client-authentication.html
git clone https://github.com/OpenVPN/easy-rsa.git
cd easy-rsa/easyrsa3
./easyrsa init-pki # PKI 環境を初期化
./easyrsa build-ca nopass # 認証局 (CA) を構築
./easyrsa build-server-full server nopass # サーバー証明書とキーを生成
./easyrsa build-client-full client1.domain.tld nopass # クライアント証明書とキーを生成~/certディレクトリーに必要なものをまとめます。
mkdir ~/cert/
cp pki/ca.crt ~/cert/
cp pki/issued/server.crt ~/cert/
cp pki/private/server.key ~/cert/
cp pki/issued/client1.domain.tld.crt ~/cert/
cp pki/private/client1.domain.tld.key ~/cert/
証明書の登録
ACM(AWS Certificate Manager)の画面で証明書をインポート
- server
| 項目 | 値 |
|---|---|
| 証明書本文 | server.crtのBEGIN CERTIFICATEからEND CERTIFICATEまで |
| 証明書のプライベートキー | server.keyの内容 |
| 証明書チェーン | ca.crtの内容 |
- client1.domain.tld
| 項目 | 値 |
|---|---|
| 証明書本文 | client1.domain.tld.crtのBEGIN CERTIFICATEからEND CERTIFICATEまで |
| 証明書のプライベートキー | client1.domain.tld.keyの内容 |
| 証明書チェーン | ca.crtの内容 |
ClientVPN
Client VPNエンドポイントの作成
左メニューの仮想プライベートネットワーク(VPN)→クライアント VPN エンドポイント クライアント VPN エンドポイントの作成
| 項目 | 値 |
|---|---|
| 名前タグ | private-iot-clientvpn |
| クライアント IPv4 CIDR | 172.31.0.0/16 |
- 認証情報
| 項目 | 値 |
|---|---|
| サーバー証明書 ARN | server |
| 認証オプション | 相互認証の使用 |
| クライアント証明書 ARN | client1.domain.tld |
- 接続ログ記録
| 項目 | 値 |
|---|---|
| クライアント接続の詳細を記録しますか? | いいえ |
- その他のオプションパラメータ
| 項目 | 値 |
|---|---|
| DNS サーバー 1 IP アドレス | 10.0.0.2 |
(* VPCのCIDRの末尾が2がAWS提供のDNSサーバーのIPアドレスです) https://docs.aws.amazon.com/ja_jp/vpc/latest/userguide/VPC_DHCP_Options.html#AmazonDNS
関連付け設定
関連付けタブから関連付け
| 項目 | 値 |
|---|---|
| VPC | private-iot-vpc |
| 関連付けるサブネットの選択 | private-iot-vpc-subnet-1 |
セキュリティグループ設定
セキュリティグループタブからセキュリティグループの適用
| 項目 | 値 |
|---|---|
| セキュリティグループ ID | private-iot-sg-clientvpn |
認証設定
認証タブから受信の承認
| 項目 | 値 |
|---|---|
| アクセスを有効にする送信先ネットワーク | 10.0.0.0/16 |
| アクセスを付与する対象 | すべてのユーザーにアクセスを許可する |
Raspberry Pi
OpenVPNのインストール
sudo apt update
sudo apt install openvpn openvpn-systemd-resolved -y
AWSのマネジメントコンソールのクライアントVPNエンドポイントの設定画面 上部にあるクライアント設定のダウンロードから設定ファイルを取得
設定ファイルの末尾に以下を追記。これをしないとAWS側のDNSサーバーが参照されません
script-security 2
up /etc/openvpn/update-systemd-resolved
down /etc/openvpn/update-systemd-resolved
設定ファイルはこんな感じです
client
dev tun
proto udp
remote cvpn-endpoint-xxxxxxxxxxxxxxxxx.prod.clientvpn.ap-northeast-1.amazonaws.com 443
remote-random-hostname
resolv-retry infinite
nobind
remote-cert-tls server
cipher AES-256-GCM
verb 3
<ca>
-----BEGIN CERTIFICATE-----

-----END CERTIFICATE-----

</ca>


reneg-sec 0

script-security 2
up /etc/openvpn/update-systemd-resolved
down /etc/openvpn/update-systemd-resolved
接続
sudo openvpn --config downloaded-client-config.ovpn --cert cert/client1.domain.tld.crt --key cert/client1.domain.tld.keypi@raspberrypi:~ $ sudo openvpn --config downloaded-client-config.ovpn --cert cert/client1.domain.tld.crt --key cert/client1.domain.tld.key
Sat Jul 17 09:47:16 2021 OpenVPN 2.4.7 arm-unknown-linux-gnueabihf [SSL (OpenSSL)] [LZO] [LZ4] [EPOLL] [PKCS11] [MH/PKTINFO] [AEAD] built on Apr 28 2021
Sat Jul 17 09:47:16 2021 library versions: OpenSSL 1.1.1d 10 Sep 2019, LZO 2.10
Sat Jul 17 09:47:16 2021 NOTE: the current --script-security setting may allow this configuration to call user-defined scripts
Sat Jul 17 09:47:16 2021 TCP/UDP: Preserving recently used remote address: [AF_INET]35.75.87.106:443
Sat Jul 17 09:47:16 2021 Socket Buffers: R=[180224->180224] S=[180224->180224]
Sat Jul 17 09:47:16 2021 UDP link local: (not bound)
Sat Jul 17 09:47:16 2021 UDP link remote: [AF_INET]35.75.87.106:443
Sat Jul 17 09:47:16 2021 TLS: Initial packet from [AF_INET]35.75.87.106:443, sid=3ff2acdd fabd509e
Sat Jul 17 09:47:16 2021 VERIFY OK: depth=1, CN=Easy-RSA CA
Sat Jul 17 09:47:16 2021 VERIFY KU OK
Sat Jul 17 09:47:16 2021 Validating certificate extended key usage
Sat Jul 17 09:47:16 2021 ++ Certificate has EKU (str) TLS Web Server Authentication, expects TLS Web Server Authentication
Sat Jul 17 09:47:16 2021 VERIFY EKU OK
Sat Jul 17 09:47:16 2021 VERIFY OK: depth=0, CN=server
Sat Jul 17 09:47:16 2021 Control Channel: TLSv1.2, cipher TLSv1.2 ECDHE-RSA-AES256-GCM-SHA384, 2048 bit RSA
Sat Jul 17 09:47:17 2021 [server] Peer Connection Initiated with [AF_INET]35.75.87.106:443
Sat Jul 17 09:47:18 2021 SENT CONTROL [server]: 'PUSH_REQUEST' (status=1)
Sat Jul 17 09:47:18 2021 PUSH: Received control message: 'PUSH_REPLY,dhcp-option DNS 10.0.0.2,redirect-gateway def1 bypass-dhcp,route-gateway 172.31.0.33,topology subnet,ping 1,ping-restart 20,ifconfig 172.31.0.34 255.255.255.224,peer-id 0,cipher AES-256-GCM'
Sat Jul 17 09:47:18 2021 OPTIONS IMPORT: timers and/or timeouts modified
Sat Jul 17 09:47:18 2021 OPTIONS IMPORT: --ifconfig/up options modified
Sat Jul 17 09:47:18 2021 OPTIONS IMPORT: route options modified
Sat Jul 17 09:47:18 2021 OPTIONS IMPORT: route-related options modified
Sat Jul 17 09:47:18 2021 OPTIONS IMPORT: --ip-win32 and/or --dhcp-option options modified
Sat Jul 17 09:47:18 2021 OPTIONS IMPORT: peer-id set
Sat Jul 17 09:47:18 2021 OPTIONS IMPORT: adjusting link_mtu to 1624
Sat Jul 17 09:47:18 2021 OPTIONS IMPORT: data channel crypto options modified
Sat Jul 17 09:47:18 2021 Outgoing Data Channel: Cipher 'AES-256-GCM' initialized with 256 bit key
Sat Jul 17 09:47:18 2021 Incoming Data Channel: Cipher 'AES-256-GCM' initialized with 256 bit key
Sat Jul 17 09:47:18 2021 ROUTE_GATEWAY 192.168.0.1/255.255.255.0 IFACE=wlan0 HWADDR=dc:a6:32:c2:07:8a
Sat Jul 17 09:47:18 2021 TUN/TAP device tun0 opened
Sat Jul 17 09:47:18 2021 TUN/TAP TX queue length set to 100
Sat Jul 17 09:47:18 2021 /sbin/ip link set dev tun0 up mtu 1500
Sat Jul 17 09:47:18 2021 /sbin/ip addr add dev tun0 172.31.0.34/27 broadcast 172.31.0.63
Sat Jul 17 09:47:18 2021 /etc/openvpn/update-resolv-conf tun0 1500 1552 172.31.0.34 255.255.255.224 init
dhcp-option DNS 10.0.0.2
Too few arguments.
Too few arguments.
Sat Jul 17 09:47:18 2021 /sbin/ip route add 35.75.87.106/32 via 192.168.0.1
Sat Jul 17 09:47:18 2021 /sbin/ip route add 0.0.0.0/1 via 172.31.0.33
Sat Jul 17 09:47:18 2021 /sbin/ip route add 128.0.0.0/1 via 172.31.0.33
Sat Jul 17 09:47:18 2021 WARNING: this configuration may cache passwords in memory -- use the auth-nocache option to prevent this
Sat Jul 17 09:47:18 2021 Initialization Sequence Completed
接続テスト
(IoT Coreのデバイスの作成や証明書の取得は省略。。。)
VPN接続したままだとインターネットに繋がらないので一旦VPNを切断して実行
mkdir ~/iot-sample
cd ~/iot-sample/
python3 -m venv .venv
source .venv/bin/activate
pip install awsiotsdk # AWS IoT Device SDK v2 for Python
wget https://raw.githubusercontent.com/aws/aws-iot-device-sdk-python-v2/main/samples/pubsub.py #サンプルプログラム
ここまでできたら再度VPNを接続してPubSubのテスト
エンドポイントはインターネット経由でつなぐときと同じです。
python pubsub.py \
  --endpoint xxxxxxxxxxxxxxx-ats.iot.ap-northeast-1.amazonaws.com \
  --root-ca AmazonRootCA1.pem \
  --cert xxxxxxxxxx-certificate.pem.crt \
  --key xxxxxxxxxx-private.pem.key
Connecting to xxxxxxxxxxxxxxx-ats.iot.ap-northeast-1.amazonaws.com with client ID 'test-3c246580-3dc8-4268-9daf-731b3e42288b'...
Connected!
Subscribing to topic 'test/topic'...
Subscribed with QoS.AT_LEAST_ONCE
Sending 10 message(s)
Publishing message to topic 'test/topic': Hello World! [1]
Received message from topic 'test/topic': b'"Hello World! [1]"'
Publishing message to topic 'test/topic': Hello World! [2]
Received message from topic 'test/topic': b'"Hello World! [2]"'
Publishing message to topic 'test/topic': Hello World! [3]
Received message from topic 'test/topic': b'"Hello World! [3]"'
Publishing message to topic 'test/topic': Hello World! [4]
Received message from topic 'test/topic': b'"Hello World! [4]"'
Publishing message to topic 'test/topic': Hello World! [5]
Received message from topic 'test/topic': b'"Hello World! [5]"'
Publishing message to topic 'test/topic': Hello World! [6]
Received message from topic 'test/topic': b'"Hello World! [6]"'
Publishing message to topic 'test/topic': Hello World! [7]
Received message from topic 'test/topic': b'"Hello World! [7]"'
Publishing message to topic 'test/topic': Hello World! [8]
Received message from topic 'test/topic': b'"Hello World! [8]"'
Publishing message to topic 'test/topic': Hello World! [9]
Received message from topic 'test/topic': b'"Hello World! [9]"'
Publishing message to topic 'test/topic': Hello World! [10]
Received message from topic 'test/topic': b'"Hello World! [10]"'
10 message(s) received.
Disconnecting...
Disconnected!うまくいきました。
ちなみに、エンドポイントのIPアドレスは、VPN内のプライベートIPアドレスとなっています。
(.venv) pi@raspberrypi:~/iot-private $ ping xxxxxxxxxxxxxxx-ats.iot.ap-northeast-1.amazonaws.com
PING xxxxxxxxxxxxxxx-ats.iot.ap-northeast-1.amazonaws.com (10.0.1.105) 56(84) bytes of data.
^C
--- xxxxxxxxxxxxxxx-ats.iot.ap-northeast-1.amazonaws.com ping statistics ---
1 packets transmitted, 0 received, 100% packet loss, time 0ms

(.venv) pi@raspberrypi:~/iot-private $
やったね。
インターネット経由での接続を拒否する方法
ここまでで、VPNを使ったIoT Coreまでの通信はできました。 追加で、 インターネット経由での接続を拒否し、PrivateLink経由のみを許可 する設定を紹介します。
設定は、IoTポリシーで、ConditionにVPCエンドポイントからのアクセスに限定します。
{
  "Version": "2012-10-17",
  "Statement": [
    {
      "Effect": "Allow",
      "Action": "iot:*",
      "Resource": "*",
      "Condition": {
        "StringEquals": {
          "aws:SourceVpce": "vpce-0bae8fd9e8c2b2879"
        }
      }
    }
  ]
}
こうすると、VPNオフでインターネット経由での通信の場合にはエラーとなります。
(.venv) pi@raspberrypi:~/iot-private $ python pubsub.py --endpoint xxxxxxxxxxxxxxx-ats.iot.ap-northeast-1.amazonaws.com --root-ca AmazonRootCA1.pem --cert xxxxxxxxxx-certificate.pem.crt --key xxxxxxxxxx-private.pem.key
Connecting to xxxxxxxxxxxxxxx-ats.iot.ap-northeast-1.amazonaws.com with client ID 'test-25dc3da9-5177-4a27-85f7-21fdf9456369'...
Traceback (most recent call last):
  File "pubsub.py", line 133, in <module>
    connect_future.result()
  File "/usr/lib/python3.7/concurrent/futures/_base.py", line 432, in result
    return self.__get_result()
  File "/usr/lib/python3.7/concurrent/futures/_base.py", line 384, in __get_result
    raise self._exception
awscrt.exceptions.AwsCrtError: AWS_ERROR_MQTT_UNEXPECTED_HANGUP: The connection was closed unexpectedly.
(.venv) pi@raspberrypi:~/iot-private $
おまけ(Raspberry PiのOS起動時にVPNに自動接続する方法)
downloaded-client-config.ovpnの拡張子を.confに変更します。
(ついでにファイル名もclientvpn.confにしました)
そして、ファイル中に接続に使用する証明書とキーを追記します。
(<key></key>の部分と<cert></cert>の部分です。)
client
dev tun
proto udp
remote cvpn-endpoint-xxxxxxxxxxxxxxxxx.prod.clientvpn.ap-northeast-1.amazonaws.com 443
remote-random-hostname
resolv-retry infinite
nobind
remote-cert-tls server
cipher AES-256-GCM
verb 3
<ca>
-----BEGIN CERTIFICATE-----
-----END CERTIFICATE-----
</ca>
<key>
-----BEGIN PRIVATE KEY-----
-----END PRIVATE KEY-----
</key>
<cert>
-----BEGIN CERTIFICATE-----
-----END CERTIFICATE-----
</cert>

reneg-sec 0

script-security 2
up /etc/openvpn/update-systemd-resolved
down /etc/openvpn/update-systemd-resolved
ファイルを用意できたら、所定の位置にコピーします。
sudo cp clientvpn.conf /etc/openvpn/client/clientvpn.confsystemctlの自動起動設定を追加(clientvpnの部分がconfファイルのファイル名になります)
sudo systemctl enable openvpn-client@clientvpn.service
sudo systemctl start openvpn-client@clientvpn.service
ClientVPN用の証明書について
公式ドキュメントにあるEasy-RSA 3を使った方法で検証しましたが、「AWS Certificate Manager プライベート認証局」で生成した証明書でも良いようです。
https://aws.amazon.com/jp/premiumsupport/knowledge-center/client-vpn-authenticate-private-ca-acm/